Monday, 28 January 2013

Changes to Filming

On location, we discovered that there were problems with some of the original decided features of our scene:
  • When filming our test shots, it became apparent that the path we had originally chosen for the victim to follow around the Royal Naval College into the foot-tunnel would cause difficulties. We had to block out a separate route through the grounds ensuring that no restaurants, passing visitors, sign posts for the gift shop or shots in which the glass casing of the Cutty Sark were visible. This proved difficult due to the lack of lighting upon the foot-paths in the area and the obvious commercialisation of the location.
  • On our original storyboard, no filming was included from the individual view of the victim as we decided to film the majority in CCTV format due to no intended empathy being felt towards the victim as an emotional bond between them and the audience as their character is insignificant as part of the plot.
  • The skyline shots we are using within our scene originally were not planned and were added as a decision during filming. We had planned to include establishing shots to determine the importance of our location as an anonymous city (London) but originally of the college and Cutty Sark itself but on location, we found the brighter and more definitive example of London as a location would have been better represented using the skyline shot of the City buildings across the Thames as a universal symbol.
  • Our first plan depicted the entirity of the scene filmed in the tunnel to be produced in black and white as CCTV footage but due to the supernaturality of our plot and our intention to emphasise this, we can now chosen to switch between colour during these shots to distort the image.


Shortlist of Names.

Shortlist of Names. 


This survey is a shortlist of names for our film opening name. The plot of the film is a supernatural killer clown with a calling card of a typical clown smile, alike the joker, with a smeared lipstick smile. If you could just complete this one question on the link below which leads to a survey monkey where we can analyse the results, we would be grateful. The survey will take under a minute as there is only one question, so thank you for all of the responses.


www.surveymonkey.com/s/5DD7MXL

Sunday, 27 January 2013

Carnival Music

This is the typical scary carnival music which has a slight twist. This would be a really good option for us because it conforms with the genre of our film opening and there is also a clown in it which also relates to the music which is playing. By having music which fits in with the film opening helps to add effect to what is happening in the scene and therefore this shows they have relation and its not just a random piece of music. With it being distorted it helps in order add to the effect that the clown isn't normal and that something is affecting the music, just like how the clown is affecting the scene itself through changing it from black and white to colour through its actions. I really like this piece of music and the other good thing about it is that it isn't copyrighted and therefore if we email the poeple who made the piece of music then they should allow us to use it if we credit them and therefore it is easy to access. If we cannot let them to let us use it then we should be able to create something similar by using a app on the map and therefore the music will be created by us which would be good.

This piece of music has been created in order to create a suspenseful atmosphere and this would be good to include in the final scene where the clown appears in the screen creating a jump factor for the viewer. The music is of a high pitch and therefore is quite awkward for the viewer to listen to because it isn't something that is usually nice and therefore this would be really good as it would make the viewer uncomfortable and the jump more effective. I also like how it fades in each time it gets more and more intense and therefore this means that if we wanted to use another bit earlier in the scene then we could as each bit it steps up a bar and therefore this means that if the opening gets more intense then we can add the next piece of music. It wouldn't be to hard in order to make but it isn't copyrighted and therefore this means that we could use it if we asked the owner and then credited them in the film. This is good as it saves time however if we want to make bits different then we will have to do this ourselves. 

This is the final part of music which I found which is of a ring tone and this is used in order to scare people as it isn't a pleasant ring tone and therefore may be used in order to mean something. This is shown in the film One Missed Call which when the phone rings with a particular ring tone means that, that person is going to die. We wont use it for a phone however it would be quite effective if overlaid on top of another piece of music where we could make a compilation of different stuff and then put it together in order to create one piece of effective music and therefore be more tension rising. Again the music is not copyrighted and therefore if we did want to use it then we would have to ask the owners permission in order use it.

Tuesday, 22 January 2013

Name Choices

 The Naming Process

 To begin progress within deciding on a name for our film, I began with making a list of the main components of our scene, a technique that would allow names to be thought up due to what is included within our piece. 
However, it is difficult to decide upon a definitive name due to certain features of our opening (such as location) due to the following plot not to have been decided in depth. For example, as we are only producing the opening scene in which a murder takes part in a tunnel we could in theory title it around this feature but if the film were to continue and be produced following on from this scene, it is not initially intended for the majority of the setting to be placed in that tunnel.

Whilst brainstorming choices, I included all possible titles I came up with despite a number of them being useless due to sounding terrible and having other issues so that when shown to the rest of the group presenting the ideas, it can allow us to critique different choices and possibly come up with more ideas related to them.

At the current stage of process, the three most effective choice (in my opinion) would be; 'Grin.', 'Whiteface' and 'Smile, Please.' as having as few syllables as possible allows the name to be short and memorable .
  • Grin refers to the clown's face itself and also towards the lipstick mark they leave upon their victim acting as a calling card.
  • Whiteface is the name of the type of clown we are using within our scene as the antagonist, a comedy grotesque whiteface. (Allows us to enforce to the audience that the clown itself is the focus, not the victim or location.)
  • 'Smile, please' also refers to the calling card mark left upon the victim's body after the murder has taken place. (Conveys a sinister tone, typically a possible title choice for a comedy film.) 

Editing for a second time.


More Editing. 


After the first editing session, we all decided that it there were still a few more clips left over that we could include within our film opening first sequence before the credits. We had a few clips in which were left over from the filming, in which included disorientating shots, that could foreshadow what is to come within our film opening. By selecting the piece of the clip in which I wanted to be included in the original opening,  I selected the clip, and split it, so that i would be able to source the piece that was needed for the opening. I then placed this back onto the dashboard,to enable it to be considered part of the film opening, and played it various times to make sure that it fitted in with rest of the film opening in which had already been editing and looked consistent with the rest of the footage.  Although I liked the consistency with the rest of the clips, i felt that it needed to have a smoother transition, and needed to fade to black to enable the consistency to continue.

As there is a lot of darkness in our clip, with the monochrome setting, I decided it would look better if it fades to black at the end, to enable the smooth transition at the end to continue on to the next clip. By clicking on the transitions, and then searching through to find fade to black, i then chose this to work together with the clip that I was editing to make sure that it would fade in, and also fade out, which would make it consistent with the rest of the clip, and would not look completely different from the rest of the clip, it would also mean that altogether the clip would run smoothly with nothing drawing paticular attention from the audience's perspective.


As the clip that was introduced was not as steady as the rest of the film opening, i had to run a stabilisation analysis, to determine how stabilised the rest of the film opening is, and which will then compare this to the clip that i am about to introduce. This took around 5 minutes, but the analysis was finally complete, and I then applied this to the clip to stabilise the clip, to continue the consistency onto the next of the clips which will be included within the opening.

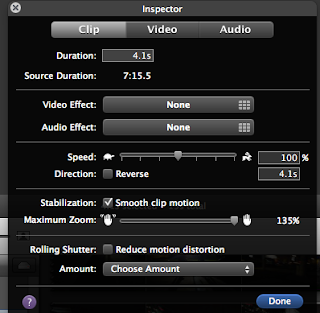
There were many things in which I changed about the clip, to make sure that I got the best out of the set materials that I wanted. The source clip for this particular extract was only 4 seconds long, as the film opening is only 2 minutes and I did not want to bore the audience or drag the clip out for more than which was intended. I did not think that any video effects or audio effects needed to be added, but i did take out any of the sound effects, as I was not sure if a voice over needed to be included. The speed was kept the same, but i stabilised the clip using the smooth clip motion, as mentioned in the above analysis of the print screen. The maximum zoom was just allowing how strong and close up the zoom would be, in which i though would be necessary to obtain the detail within the location.


Sunday, 20 January 2013

Shooting Script for 9.01.2013

Location:
Greenwich Underpass/Cutty Sark

Shots which we where filming:
. We were going to re film the skyline again as when we had gone before it turned out too dark and therefore we are aiming in order to film at different times in order to put together a few different skyline shots in different lights.
. We also did shots of inside the tunnel for the credits as we wanted different spooky/creepy shots from inside the tunnel as the credits rolled around with different effects placed over the top.

Time we got there:
. We got there around 4:10 when it was just coming up to the sunset and therefore we did a shot of the skyline in a lighter environment to see whether or not it would be useable in our opening.
. We left around 6 when it was completely dark and all the lights where on in the buildings of the skyline and these proved to be more effective as they stood out much more and it made the skyline more prominent than with the lights off.
. We stayed there for the entire time and took other shots in different lights and explored the area in order to look around the college and see if there where any other locations which we could consider but many of them where too far away from the actual tunnel itself.

Props which we took with us:
. We took the camera in order to film and before we went we searched up the camera and found out that it had an IA setting which meant that the skyline would film in a better quality.
. We also took the tripod (Gorilla Stand) which wraps around objects and therefore made it easier in order to film the skyline as we attached it too the beam and then it was steady when it filmed.


Who went:
. Lily, Becky and Lauren


P.S. we couldn't film in the week after because we where planning on visiting the location on Saturday 19th January but due to the snow we where unsure about whether we could get there or whether it would get worse throughout the day and find it difficult in order to get back. Also the clowns shoes have not yet been done and therefore it would be the point of view shot which we would film, but if there was snow on the floor then we couldn't because there would be snow in one shot and not the other. Therefore we decided that we where going to do it a different time as a group when the snow was gone and everything was complete and therefore restrict the amount of re filming we have to do.


Monday, 14 January 2013

Editing Choices


Shot One- Rolling Credits
Applying a bleach bypass effect
Increased speed up to four times it's original pace


Shot Two- London skyline
Applied bleach bypass effect
Speed increased by half


Shot Three- London Skyline
Speed increased four times
Reduced Motion Distortion
Increased zoom by 7%
Smoothed stability

 Shot Five- London Skyline

Increased zoom by 16%
Smoothed stability
Reduced motion distortion


We wanted to increase the speed at the beginning to shock the audience and set the a fast pace for our opening. We sped up the clip duration to enable us to fit in more shots and we liked the resulting effect. By speeding up the start, the audience have no idea what is going on, which is our intention, as we wanted the audience to be confused and disorientated. By using the tunnel shots, it allowed a smooth movement going through the tunnel and established the location.


When we applied the bleach bypass, we wanted an effect that darkened the tunnel and created a dirtier more sinister horror effect, as it complemented the surroundings and created shadows on the walls, in which would interest the audience to what unusual events are occuring within the tunnel.


When editing the skyline, we decided to stabilise the establishing shot, as we did not want it to jolt. Our intention was for the establishing shot to be a serene shot, in contrast to the tunnel opening it follows. The shot included London lit-up at night and we increased the contrast to enable the audience to be able to establish the buildings in the shot, and connect it with London. The motion distortion was needed to enable the smooth movement, as when it was first shot, it was taken through shaken hands, which post-filming we decided wasn't an effect we felt appropriate for this shot.

Sunday, 13 January 2013

Deconstruction - Hoist


Camera angles;
          There were some really interesting camera angles within this short film.

  • Most of the shots, though, were point of view shots.
  • I think that using point of view shots is quite effective because it makes us feel like part of the film as we are seeing exactly what the protagonist is seeing. 
  • There are some close ups of the 'demons' found in the tunnel too. I think that these are really good because the close up means that we, as the audience, get more of a surprise.

  • Though, I feel that there could be a larger range of camera angles used because the film does start to get a little boring and this could make it much more interesting.
Mise en scene;
  • The effect being used on the camera throughout this film, makes the inside of the tunnel look rather green and quite dirty. This is very effective because the green connotes that something may be wrong supernaturally, whilst the dirt helps to add to the overall eerie feel of the film.
  • Though, the blood used in this film is not very authentic as it is a very bright red. Although this connotes the danger that the protagonist is in, it does not look very real. This ruins part of the mise en scene.
  • Also, when the protagonist comes to the locked lift, some text appears on the screen and I think that it would have been much more effective if the note was printed on a piece of paper rather than edited in.

  • I think that, overall, the mise en scene is quite lazy throughout this film as nothing seems to have much meaning. We only see the protagonist's shoes, but even then the colour or style does not seem to make much sense to us as the audience. 
Lighting;
  • The lighting in the Greenwich tunnel is amazing as it is and I think that this person has used it to their advantage.
  • The light almost goes in a full circle, which shows how trapped the protagonist is within this tunnel.
  • The green tinge to the camera also changes the colour of the lighting to show that something is wrong.
  • I think that the lighting in this short film is amazing. It is using the natural resources that are within the tunnel, which is exactly what we must do too.
Sound;
  • I really like the sound used in this film. To start with, there is a jumpy tune that varies in pitch. This tune adds an eerie tone to the whole video. Especially with the single piano notes.
  • The tune picks up in speed when the protagonist gets into trouble and I think that this is good because the music is reflecting what the character is feeling, drawing us even further into their world.
  • There are also some overlaying non-diegetic sounds. These are difficult to explain, but have the same effect as someone running their nails down a blackboard. They make a chill run down your spine and I think that these make the film opening.
  • Towards the end of the film, there are some zombie-like moans. I think that these seem a bit inappropriate seen as there are no zombies, as far as we know.
Editing;
  • The editing of this short film is probably my favourite part. It is crisp and effective.
  • It makes us feel uneasy as it jumps from place to place. This is good in a horror film as it puts us on the edge of our seat, waiting for something to happen.


Music

The music choice for the first part of our storyboard is incredibly important. It has to be appropriate and it has to suit our protagonist. To make the choice even more difficult, the song cannot be copyrighted. 

These are some possible songs;


This particular song is probably my favourite out of all of the options. I like the way that the notes seem quite 'off' and out of tune because this would help to make the scene more eerie, especially as it will be shot in the dark. 
Also, I think that even the few words in the song are particularly interesting. 'You blew it' makes it seem as if there has been trouble.


I tried to find a variety of songs that would suit both the location and the protagonist. Some of the songs above are quite urban, whereas others would just suit the story line better due to the notes used within the songs. 

3rd Location Visit

On our third location visit we decided to re film the London Skyline because we didn't have a good quality and therefore it needed to be re filmed otherwise it wouldn't be acceptable for the short film. We went a little bit earlier and this meant that we had more light in order to test out different times in order to determine the best time in order to film for us. We arrived near sunset an filmed then but then decided to stay until it was dark and all the lights where turned on.


During the time which we waited for the sun to set we went around the college and looked at other potential places in order to film and although it was a really nice place in terms of lighting and architecture, it was too far away from the tunnels entrance for us to consider it as a place for filming and therefore will keep it in mind for future reference about whether or not if needed it could be reconsidered as another place in order for the victim to come from.


We found coming again to film the skyline extremely useful as we were able to film in different lights and therefore then pick out favourite version of the skyline in order to pick the best one for our film opening. We felt that overall when it is darker it is better as all the lights are on and te reflections of the water are really nice and therefore we are more likely to go with the darker shots rather than the lighter ones due to the effect and also that the other shots are filmed in the dark.


Saturday, 12 January 2013

Deconstruction - Trapped ( A Level Film Opening.)

Deconstruction - Trapped.


This week I have chosen to deconstruct another A Level piece in which was filmed at the same location that we are going to be setting ours at. I have chosen to deconstruct this piece, as it will give us some ideas on the lighting, how another group have incorperated the location into their own film opening and how it will be percieved on camera. It also gives us a chance to look at the Mise En Scene of the tunnel, to see how effective the underlying design is, and how clear the features stand out on camera - defining how seeable the wall texture in the tunnel is. Although this was filmed 2 years ago, I still feel that it is relevant to our filming, as we can see how other people have adapted and used the enviroment to their own benifits and strengths.

Camera Angles/ Shot. 

  • There was not a wide range of camera angles, within this piece of filming, just mainly full body shots, establishing the tunnel location around them, and establishing the stalker into the scene. 
  • I liked the use of the close up shot on the face, which to me demonstrated to the audience that the girl was trapped within this tunnel, and that she was still yet unaware of what is going on, it also to me felt like a type of CCTV that you would see within a reality TV show such as big brother, as she is clearly being watched, but has no idea that the camera is this close to her, or that she is even being watched. 
  • By following her walking down the alley with the camera, a tracking is being used, through the point of view of the stalker, which I feel is quite a good concept, as we get to see exactly through their perspective. 
  • There was no a variety of different camera angles used, which made the scene opening quite repetitive, and in my view quite boring, as we already knew what was coming up, which is the reason why I would have liked to have seen quite a few more camera angles included as the opening was quite basic. 
  • I felt that the tracking of the subject was quite good, as it paned from right to left to reveal the protagonist running down the tunnel a countless amount of times, but due to it being over used, in the end it became boring and predictable. 

Mise En Scene


  • The tunnel linked in with the title, as she was trapped, with the underlying designs also indicating that she was trapped within, by the use of the parallel walls, which would usually create a sense of security, these created a sense of confinement, showing that she really was trapped, with not a lot in which she could do to stop/escape from it. 
  • The editing in of the antagonist was good, and showed that he was a figure of the imagination, that he was not from this world and was not real, but when it was repeated many times.
  • The use of the red sign on the wall within the shot connotes the danger in which the protagonist is in , although it was placed in the tunnel already, I feel that it was a smart decision including it into the camera shot, as it is the only thing that stands out in colour within the whole piece. 

Lighting
  • The lighting in the tunnel is artificial, which adds to the suspense of the filming. It is also reflects off of the side of the wall, in which darkens the edges of the tunnel, which creates a perfect lighting scheme for this location.
  • A dark circle is shown at the top of the tunnel, in which could be foreshadowing her being followed, and also builds effect and tension within the scene.
  • There is no way of altering the tunnel lights, as they are one set brightness, and are connected to the electricity mains. This means the only way of altering the lighting would be to use additional lights, which were not used in this film opening, which could have been quite useful, as they could show the harsh reality of what is happening to the protagonist.

Sound. 

  • I really like the sound at the start of this film opening, as it is what you would expect within the tunnel, but with the sound of silence echoing around the tunnel, and being maximised, it creates tension within the audience, as we are expecting something/someone to jump out from within the tunnel as this is in the horror genre. 
  • With the use of a little irregular beat put in, which sounds alike a scale in which would be used at a part of tension in a unexpected occurrence in a horror movie, I feel this sound works incredibly well for the genre and the piece.
  • The sharp, almost screeching sound at the end, is used to make the audience jolt/jump, in which it did successfully the first time for me, but I do not feel it was effective enough to fully startle a audience on a large scale. 


General Comments.

  • I did not think that the acting was strong enough, especialy at the end, as you could tell that the girl was not scared at all, and did not react enough to what had just happened. She would not have been that calm. Also when running through the tunnel and the facial close ups, she did not look as scared as I would have expected from a protagonist within a film opening.
  • There were elements that I did like, such as the editing, and a few of the camera angles, but they were over used, which took away the effect in which was the sole reason they were created, which then dampened the effect at the next time. 

Evaluation of the location visits

The first visit to the Greenwich tunnel, we decides to concentrate on the tunnel itself.
We were able to consider the different possible mise en scene opportunities and discuss how we would use the odd lighting to our advantage.
We were also able to decide where abouts in the tunnel we wanted to film and how much background noise there was in that particular area. This meant that we could figure out how to block out the unnecessary noise that could affect how professional our shots are.
I think that, overall, the tunnel is the perfect location for some of our film opening as it is intimidating and quite dark.

On the second visit, we were able to film some test shots outside the tunnel and near the grassy areas.
We found it incredibly difficult to find areas that had enough lighting to show the actors. Though, we found some light spots and also how to play with the lighting that we did have around us.
I think that the most productive part of the second visit was the skyline shots. The camera did not show the lights properly on video mode so I suggested that we just take a few photos of the skyline and see how they looked one after the other. This worked better than we thought and decided that this would be a good thing to use in our film opening

Monday, 7 January 2013

Firestarter

Source of Inspiration: Firestarter Music Video


  • During our location selection process as we began to consider the use of a tunnel, we decided for sources of inspiration to look outside of only the horror genre and began looking at projects outside of film.
  • The concept of a music video introduced the possibility of using sound overlay to mimic diegetic sound whilst removing all other extraneous background sound. 
  • We have chosen to adapt this and use it within our scenes outside of the tunnel, with our victim listening to music, allowing us to dismiss any interrupting background sounds and to place the audience in a empathic position over the victim, understanding how oblivious they are to danger around them. 
  • Another advantage the video made apparent to us was lighting within a tunnel, the prominent circles of light within the tunnel causing different parts of the tunnel to be far more brightly lit than others. 
  • For our scene, the darker sections can be used to show the antagonist as they approach the victim in stop motion, as the victim disappears from light into dark, their lack of hope becoming apparent.

Evaluation of Practical Progress So Far

Our Visit to Location

  • When we took our first visit as a group to visit our location and started test shooting to ensure when it came to post-production, we would not be faced with having to refilm sections due to lighting and other issues that may occur.
  • We established in which order and when we would film certain shots, scheduling them in sections and in order of importance.
  • Also, we blocked out where and how the camera/actors would move, altering our original decisions due to what was more easily achievable and effective within our choice of location.
  • One of our changes made was to attach our camera onto the top of a bicycle to enable smooth, steady movement when the camera follows the actor's path.
  • We were also able to establish where we would chose to film our opening shots to establish the region and background to our plot.
  • In terms of costume, our visits also confirmed to us that the antagonist being dressed in white and red would be far more affective in terms of visibility due to the lighting available to us (allowing us to choose a final costume).
  • By the finish of our first visit, we'd made effecient progress in determining exactly how we would film and also it enabled us to discover what we would need to negotiate and compromise in future, therefore allowing us to plan our next visit.

Sunday, 6 January 2013

Budget

Filming Budget

Taking all of the filming into consideration, we decided that there was a variety of different things in which we needed to buy in order to make our film opening high quality and look realistic, in which was our end goal. As we are not a media company, or had no sponsors, our budget was completely off our own backs and own pockets. As there are 4 of us, it was easy for us to be able to all put our money together and divide the cost, in which meant we were able to buy high quality props for our piece.

The variety of things that are included within the budget for each character are;

Clown (Antagonist):

  • Clown Costume: We had trouble with the clown costume as our main problem was whether to buy the costume ourselves or to hire one from a costume shop. The main issue was the timescale in which we would be using it, and also the condition as we wanted our clown to be covered in 'blood' which we would be unable to do to a costume from a fancy dress shop, as when it would be returned it would be deemed unusable, and we would have to pay extra prices to get it dry cleaned. In the end the cost of hiring a costume for a week was £15 to £20, meaning if we wanted to hire in the holidays it would be costing us £30 to £40 . Therefore we decided on buying a costume in which we all agreed on or £20 which meant £5 between us all. We also wanted to buy large shoes for the clown as we felt this would add to the costume, but as we wanted this shoes to be distressed we decided upon buying a cheap pair of shoes from a charity store, in which we could completely alter to our standards to fit in with the character. For this our budget was at maximum £5, in which was highly reasonable and acceptable.


  • Balloons: as we have decided to use a assortment of colour within our film opening through the use of balloons, this also had to be incorporated into our budget as we needed to buy in bulk, to enable if any of the balloons popped during the process, and just how many we would need. Also as we have chosen to use helium and string this will be at a extra cost, in which has been incorporated and will all in all cost £20.00 with a helium tank, in which we could find cheaper at later dates if need be. This would mean a £5 cost per person in the group.


  •  Contact lenses: We were unsure on buying contact lenses, as we felt that the clown make up would be enough, but we still wanted to have a look to see if there was reason to be included. The lowest price of contacts ranged from £10 - £15 which would add to our budget in which was not necessary. Although the contacts that we looked at would have been good to compliment the face paint and the costume as they were blood red, we felt that the purchase would just have been too much and would have made the costume look over the top.

  • Make up: The face paint is all of the make up in which we need, which is being provided by Lily, as she already owned some, but we also brought extra which was £6. We chose faint paint as we felt that it would be better than a mask and look more realistic. This was include within our budget as we included all of the face paint and the brushes. It was a necessary purchase to further our costume choice, to make the clown look real, and scarier to the audience . The main colours in which we purchased complimented our horror theme; red, black, white. In which all connote darkness, death, danger and blankness, in which is the effect we wanted to create.


Protagonist


  • Costume: the costume for the antagonist is as of yet non existent, as it is their own personal preference into which they want to wear. They have a basic checklist on which is a blank unbranded t shirt as we are unable to add branding into the clip, and a pair of jeans. This make our protagonist blend into the surroundings and make him not any different to any of those who are usually in horror movies. It also raises questions as to why he is the target, and why the clown has chosen him.


  • Wounds: the wounds in which we are going to be using on the protagonist will be made via wax and fake blood. In which comes to the cost of £6 all in all. This is a essential piece of makeup in which is needed to make our wounds look realistic and fit in with the genre.


Running total so far:
With contacts and Helium tank
£62 divided by 4 - £15.50 per person.

Without contacts and helium tank
£32 divided by 4 - £8 per person.

Opening shot of London - Testing

Stop Motion


We had difficulty with the camera focusing when its quite far away from the centre of London due to the zoom not being able to go that far and therefore we had to try another method of creating the opening shot of the sky line of London. Therefore we came up with the idea of having multiple shots being taken on a camera and then sped up in order to make it look like it was filmed rather than individual shots. They looked really interesting and had a great affect with the lights trailing as the camera panned across the skyline in front of us. However on photo setting the camera took images lighter than if it was being filmed and therefore looks more like sunset than dark. That is the only issue in which we found with it and most likely with a little bit of changing done to the video it could be edited in order to make it look darker or a setting changed manually on the camera. We all really liked this idea and will experiment it more by putting it into iMovie and speeding it up in order to see whether or not it is as good as we first thought it may have been.


Video


We also filmed it after we found what setting it was in order to change the lightness of the camera in order to reveal more of the lights coming from the skyline. We liked the idea of panning the shot across so that we got the Shard in it as well which has now become another iconic land mark from its height and building material. The panning did work and you get more detail from the filming however it is extremely dark in the picture which is something I will have to investigate on the camera in order to see whether or not I change that or not. Also another issue is the distance away from the skyline as the camera cannot zoom in far enough to gain relevant detail which would define the city more however for the zoom it has the quality is at its best. Therefore we may need to investigate more before deciding whether or not filming is entirely the best option overall.

Balloons

Balloons 


A quite stereotypical idea is the clown holding the balloon at a circus or as a symbol for the clown, this therefore gave us the idea of using the balloon as a breadcrumb for our protagonist and also create tension for the audience as the balloons begin to multiply as they walk on further through the location which we are filming at.

We have decided to use a mixture of different coloured balloons in order to show the confusion within the clowns character and therefore it isn't settled within a connotation and instead spreads over the a vast majority of them instead. We thought that the idea of YELLOW and GREEN possibly being the stand out colours along with RED would connote the idea of a prominent child like figure, with an element of consumption and danger all combined within the characters. There would be less of the other colours however they would be there in order to show that vast colour contrast within the cluster of balloons which the clown is holding. 
The balloons will be Helium to enable them to float within the tunnel and also when Lily is holding them outside. This then poses the problem that if it is windy then the balloons will not stay still and this is a problem which would have to be addressed when on location and also planning in advance what day would be most suitable for us to film with the balloons depending on the weather. When inside the tunnel, the problem is making sure that they float and don't pop on the ceiling and also don't cause any problems for passers by. 

We will attach ribbons to the balloons in order to make them more fairground like and therefore the ribbons could be black as although they may not stand out as much outside, once inside they will stand out more against the camera and also connote the idea that the clown is a threat primarily but coming from the threat are many other aspects about the character that the audience may not at first understand. 

The main idea with the balloons though is to be a tension building bread crumb for the audience to notice before the protagonist notices it.

Examples of our balloons below:


Evaluation of the test filming.

Evaluation of the filming


In the winter holidays we decided that it would be a good idea to start our filming for our trailer. We decided to start off with a test shot, to enable us to check the location, the quality of the camera, the business of the location and also the lighting of our location.


Location -Tunnel & College

As we have chosen Greenwich footpath tunnel and also the grounds of the Royal Navy collage as part of our location, we chose a early start to enable us to capture the emptiness of the tunnel, and the surrounding locations, in which we completed.
This was the first time I had seen the tunnel, and I feel the location is perfect, as it gives off a ominous mood, and by even being a spectator and walking down the tunnel, the grime on the walls and the darkness puts you on edge and uneasy about the walk down the tunnel. I think that for these reasons when we are shooting the film opening the location will be completely perfect, as it fits in completely with our storyline. By having the naval college in the background, and showing that the walkway is used by a variety of people also gives our story a backing, to show that the protagonist has a reason for walking down this tunnel and choosing to walk this route at this particular moment in time.
As the walk into the tunnel is quite open, but still fenced, this could show that the protagonist is already trapped, and their fate has already been sealed even before they choose to step into the tunnel, the destiny in which is before them has already been chosen and cannot be altered. It also links to the theme of danger and uncertainty, as we already fear for the protagonist. As the walk is quite open, but walking on the paved path, this could reinforced the idea that the date has already been sealed and cannot be altered.

Establishing shot & Surroundings.
Within the tunnel it is quite hard for a location to be established, in which is why we have chosen to include a sequence of establishing London landmarks to set the location up in the minds of the audience, as with just having a walking path and a tunnel, the location could be anywhere and would be unknown to the audience. In this location we are right next to the river Thames, and are also looking onto particular London buildings in which any audience member would establish with London, such as the London eye, the shard etc. I feel that this will work effectively within our film opening, as it gives it more background and the audience a little bit of knowledge into the storyline and the surroundings of the area , in which is subverting expectations as it looks like the usual London surroundings, nothing bad is going to happen.

Quality of Camera.
As we are using a style of CCTV footage as our footage within the tunnel, we wanted to test the camera to see how effective it was in creating this footage, in which I think looks extremely effective, as we used a broom and a clip to enable the camera to stay up high without shaking, it looks incredibly like CCTV, and with the changing into the settings into monochrome, I feel that it creates the desired look that we were going for incredibly well. Also as we are using a photography camera instead of a flip camera, we are able to use HD Filming, of which i think will be effective in showing the CCTV footage in a high quality, and will make the glitches stand out more, which is the effect that we want in order to make our film opening scarier to the desired target audience, as they do not expect there to be blips and glitches, in which we are going to be creating ourselves.


Business of Location. 
As we arrived at the tunnel at 8, there seemed to be very little people around, even though it was a week day, in which proved useful for us, as it means that the tunnel will be deserted and empty at the time in which we want to film, which will give a more isolated and alone effect to the protagonist, and give the antagonist a stronger purpose, as if there was a multiple amount of people, then it would take the motive off of the antagonist, as there would be many people, which would show that the people are taking a interest, and are also they are witness's to the murder, which would be a complete other storyline, and also we would not be able to predict how each person would react, and would have to ask permission from each person taking part for our scene to be published online.

Lighting of the tunnel. 
The lighting within the tunnel was perfect for our location, as it was not too dark, so we would be able to see what was going on, but it was all artificial light, there was no natural light, in which make the tunnel feel disinclined from the natural world up above, creating a scarier atmosphere, in which we were achieving to make, As you can see on both of our youtube video's.